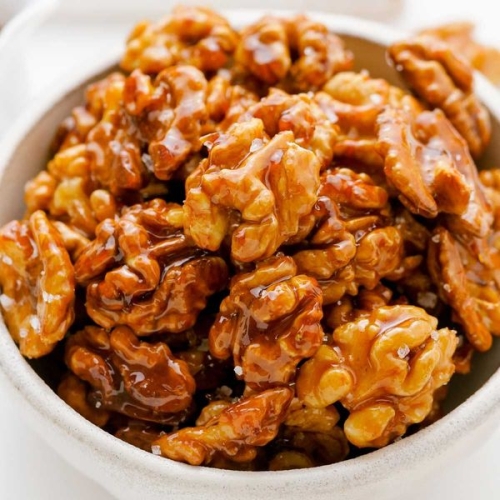
These maple walnuts couldn’t be any easier! They only call for 3 ingredients and take just 5 minutes to prepare. They also make excellent homemade Christmas gifts! They’re also naturally paleo and vegan since they only use maple as a sweetener.
These aren’t your average, overly sweet candied nuts. These are entirely maple-sweetened and have just the right amount of sweetness. Add a little vanilla and salt, and you’ve got an excellent healthier fall treat!
Ingredients
You likely already have this stuff. And if you don’t normally have maple syrup on hand, and you’re not sure what else to use it in, I have 111 maple syrup recipes that you could check out. Or just use it on some pancakes! (these Eggless Pancakes are my favorite).
Walnuts – pecans also work.
Maple syrup – I used the lightest (and cheapest) type of maple syrup. If you prefer a stronger maple flavor, definitely go with what was previously called Grade B. It’s now called “Dark Color, Robust Flavor.”
Vanilla – you can omit this if you must, but adding vanilla is always a good idea. 😉
Salt – you’ll definitely want to add this. I love salt and used ¼ teaspoon, but you may not want to use that much. I list ⅛ teaspoon in the recipe and say to add more after tasting.
I also tried these maple walnuts with pumpkin pie spice, thinking that I’d created the best candied nuts ever, but those just tasted weird. They tasted less strange with just cinnamon, but I oddly preferred them without the extra spice.
One time, I toasted the walnuts first, thinking that the final product would even be yummier, but they just tasted too roasted after the candying process.
If you prefer to soak your nuts first, I have directions on how to do that in my Walnut Butter post. However, you’ll want to opt for the dehydrator option, as I mentioned, because toasting them twice in the oven and once in the pan is excessive.
Do note that this recipe yields a thin coating. It’s not like other candied walnuts, made with granulated sugar, which have a thick sugary coating. Those are definitely nice, but not what I was going for here.
I was going for healthy, or at least healthier (though they don’t taste healthy!). Sugar is sugar, but I’ll take these over the traditional version any day. Feel free to use more maple syrup or fewer nuts if you prefer a thicker coating.
And for a savory option, check out these spiced walnuts!
How to make them
These maple walnuts are super easy to make. Let’s get started!
Line a baking sheet with parchment paper or a Silpat. This is a must, or the candied walnuts will stick to the pan.
Preheat a non-stick pan over medium-high heat. It’s important to preheat it first so that the maple syrup caramelizes properly.
Add the walnuts, maple syrup, vanilla and 1/8 teaspoon salt to the pan.
Stirring almost constantly, cook for 2-5 minutes or until the syrup has caramelized.
There should be no runny liquid left in the pan. The maple syrup coating will seem soft but will harden as it cools.
Spoon the walnuts evenly onto the lined baking sheet and spread. Test one of the nuts, but make sure that the maple coating isn’t so hot that you burn your tongue.
If it’s not salty enough, add more salt. If you don’t want the nuts to clump together after cooling, be sure to separate them now.
These harden within about 20-30 minutes, but you need to let them cool for about 2 hours before placing them in an airtight container. When not stored in an airtight container, they start to become slightly moist.
They can be kept at room temperature for several weeks. If you want to make them as gifts, I recommend keeping the nuts stored properly until you give them away.
So don’t put them in a tin can, that’s not airtight, and then let them sit for a few days. It would be better to pack them in small cellophane bags, tie them tightly with ribbon, and then place them in an airtight container until you’re ready to give them away.
If using them as a topping
If you want to use these as a topping for a cake or pie, you can either leave them whole or chop them into smaller pieces. But for both, you need to add them just before serving if they’re sitting on something kind of liquidy.
The maple syrup coating will dissolve if it’s sitting on something liquidy, like a soft cream cheese frosting. If it’s on a firmer frosting, they should be okay. But it’s safest to add them just before serving.
If you want to leave them whole to place on a cake (like this delicious Applesauce Walnut Spice Cake!), then just follow the recipe below.
But if you want to chop them up and place them all over the cake, you’ll need to chop them up (and leave behind any dusty nut remains) before candying them. That way, you maximize the amount of maple coating.
If you candy them first and then chop, you’ll have a lot of exposed uncandied walnuts.
I’ve only tried this method with walnuts and pecans, but I imagine it’d work with other types of nuts, but I’m not positive. If you try it out, let us know in the comments!
What to use them on
These maple pecans are great in so many fall recipes. I actually used pecans in the following recipes, but you get the idea. 🙂
Here you see them on my Vegan Pumpkin Cheesecake. If you’re vegan, also check out my post on Is Maple Syrup Vegan? Some manufacturers use an animal product during production that you may or may not be okay with.
Walnuts are an excellent addition to your diet, providing antioxidants and omega-3 fats. And nothing is sweeter than having candied walnuts to add a little variety, too.
So here are the most common benefits:
Compared to other nuts, walnuts have higher antioxidant activity.
They have the highest level of omega-3 fat of any other nut.
They can help decrease inflammation, which is a key culprit in many chronic diseases like cancer, Alzheimer’s and heart disease.
They help support weight control and may contribute to lower blood pressure.
They promote a healthy gut.
They help manage type 2 diabetes and may also lower the risk of type 2 diabetes.
It’s amazing to me that these little nuts can have so many benefits, plus, they’re easy to add to your everyday diet. Especially when candied! 😉
Other recipes with walnuts
If you’re hooked on walnuts, you might also try some other yummy baked goods with, you guessed it, walnuts!
These Walnut Chocolate Chip Cookies are vegan, gluten-free. They’re made with oats and oat flour making them 100% whole grain and so good!
This Paleo Vegan Apple Crisp is perfect for the season. It’s a healthy maple-sweetened treat with a crunchy walnut topping and gooey, warm, sweet apples. It’s vegan, gluten-free, grain-free and dairy-free.
Maple Walnuts (super quick, easy, 3 ingredients!)
Course Dessert, Snack
Cuisine American
Servings 6
Cook Time 5 minutesmins
Total Time 5 minutesmins
These maple walnuts couldn’t be any easier! They only call for 3 ingredients and take just 5 minutes to prepare. They’re also naturally paleo and vegan since they only use maple as a sweetener.
Get out a Silpat or a piece of parchment or wax paper.
Preheat a non-stick pan over medium-high heat. It’s important to preheat it first so that the maple syrup caramelizes properly.
Add the walnuts, maple syrup, vanilla and 1/8 teaspoon salt to the pan.
1 1/2 cups (165 grams) walnuts, 1/4 cup (60 ml) maple syrup, 1 teaspoon vanilla extract, 1/8 teaspoon salt
Stirring almost constantly, cook for 2-5 minutes or until the syrup has caramelized. There should be no liquid left in the pan. The maple syrup coating will seem soft but will harden as it cools.
Spoon the walnuts evenly onto the Silpat and spread. Test one now (making sure that the maple coating isn’t so hot that you burn your tongue!) and if it’s not salty enough, add more salt. If you don’t want the nuts to be clumped together after cooling, make sure to separate them now.
These harden within about 20-30 minutes but let them cool for about 2 hours before placing them in an airtight container. When not kept in an airtight container, they start to get a little sweaty. Can be kept at room temperature for several weeks.
If you want to use these as a topping for a cake, cupcakes, etc., chop the nuts before candying.
The nutrition information provided is calculated as a courtesy and is only an estimate. I am not a licensed nutritionist or dietitian. For the most accurate nutritional data, consult a professional or use your preferred calculator. The nutritional values were calculated based on 1/4 cup per serving. The recipe yields 1 1/2 cups.
I’m the recipe developer behind Texanerin Baking, where every recipe is thoroughly tested to ensure it works for everyone. Whether you’re baking with traditional ingredients or need gluten-free or dairy-free options, you’ll find treats that taste amazing – no matter how you make them.
Jeannie notes.. Above is curated for evaluation and recommendation from texanerin.com