Here’s another recommended recipe we found from howto.cooking.Reference Link:
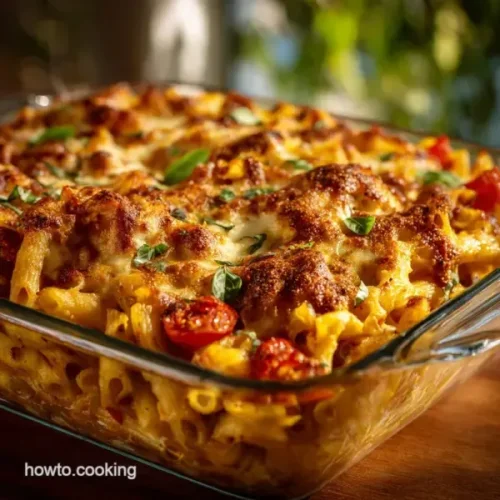
Healthy Baked Ziti the Lean Luscious Comfort Dish:
The Comfort Food Equation: Why This Healthy Baked Ziti is Guilt and Free
Baked Ziti is the ultimate hug food, right? It’s pure, gooey, tomato and soaked comfort. But honestly, sometimes the traditional version loaded with beef and industrial amounts of full and fat cheese lands in your stomach like a heavy brick. I mean, we love it, but we can do better.
This version the one I’ve finally perfected over many weeknight trials is a revelation. It’s a proper
Healthy Baked Ziti
that swaps out the heavy elements for lean proteins and sneaky veggies, making it completely nutrient and dense and so much lighter.It’s still wonderfully rich and cheesy, don’t worry. It’s a high protein baked ziti recipe that lets you enjoy the comfort without the post and meal regret.
Reimagining the Classics: Achieving Luscious Texture Without the Fat
The secret to keeping this tasting deeply satisfying without all the extra fat lies in smart binding and moisture control. We’re using part and skim ricotta and part and skim mozzarella. Does it taste exactly like the full and fat stuff?
No, but it gets 95% of the way there, and we compensate with incredible seasoning.
Crucially, the one beaten egg in the ricotta mixture is non and negotiable. That egg acts as the architectural binder that sets the cheese layer perfectly during the bake. Without it, you get a watery, sloppy mess when you cut into it.
With it, you get that lovely, defined layer of creamy inner cheese that holds its shape.
The Hidden Veggie Advantage: Boosting Flavour and Fiber Content
This is where we get incredibly sneaky with our
Healthier Baked Ziti
strategy. Everyone wants the flavour of a sauce that simmered all day, but we don’t always have time for that.By finely dicing (and I mean
finely
) carrots, onions, and courgette (zucchini), and sautéing them thoroughly at the beginning, they almost dissolve into the base.This process concentrates their natural sugars, giving the final sauce an incredible sweetness and depth that tricks your taste buds into thinking you simmered it for hours. It significantly bumps up the fiber content, making this a true weeknight low fat dinner winner, and I promise you, even the pickiest eater won’t notice them.
Sourcing the Essentials: Quality Ingredients for a Nutrient and Dense Dish
Choosing the right components is half the battle. Skimping on ingredients means you have to overcompensate with fat and salt later.
The Lean Protein Powerhouse: Selecting Ground Turkey or Chicken
If you’re used to 80/20 ground beef, you know the massive amount of liquid fat you have to drain off. We skip that step entirely by using 93% or 97% lean ground turkey.
Yes, turkey is sometimes a bit mild, but that’s okay because we are building a
lot
of flavour in the sauce base first. When you brown the turkey (Healthy Baked Ziti with Ground Turkey is my preferred choice), don’t be shy with the salt, pepper, and garlic powder.This is your chance to really season the protein so it stands up to the rich tomato.
Pasta Mastery: Working with Whole Wheat Ziti or Penne
We are absolutely reaching for whole wheat pasta here. It provides a huge fiber boost, which helps slow down digestion and keeps you satisfied longer. Don’t listen to anyone who says whole wheat pasta is terrible; when it’s covered in a rich, savory sauce, you truly won’t notice the difference.
The main thing to remember is the timing. You must pull the pasta out of the water
one minute
before the package directions say. It needs to be painfully
al dente
. Why?Because the oven is going to finish the cooking, letting the pasta absorb all that beautiful ragù without turning into mush.
The Cream Factor: Balancing Ricotta, Mozzarella, and Cottage Cheese Swaps
We are keeping the dairy part and skim to maintain that
Low Calorie Baked Ziti
status. If you really want to optimize the protein macros, you have options.
Dairy Component Traditional Use Healthy Swap/Hack
Ricotta
Part and Skim Blended small and curd Cottage Cheese
Mozzarella
Part and Skim Shredded Smoked Provolone (for flavour) Using blended cottage cheese (Healthy Baked Ziti with Cottage Cheese is surprisingly great!) is a brilliant way to cut fat while seriously boosting protein grams. Just throw it in the food processor until it’s smooth before mixing in the egg and seasoning.
And please, promise me you won’t skip the tiny dash of nutmeg in that cheese mixture. It’s what makes the ricotta taste truly authentic and complex.
Required Kitchen Tools for a Seamless Assembly
This recipe has a few moving parts, so having the right gear minimizes stress:
- A large Dutch oven (or deep, heavy pot) for cooking and combining the sauce/pasta.
- A sturdy, deep 9×13 inch casserole dish. You need those high walls for all the layers.
- A sharp knife and plenty of cutting board space you have a lot of fine dicing to do.
- A proper colander. No one needs a wobbly colander catastrophe when dealing with hot pasta.
Related Recipes Worth Trying
Peanut Butter Protein Bars The Easy NoBake Healthy Homemade Recipe
— Peanut Butter Protein Bars are the chewy satisfying fuel you need This simple nobake recipe makes incredible proteinpacked snacks perfect for quick homemade…
Healthy Zucchini Banana Bread The Ultimate Moist LowSugar Loaf
— Healthy Zucchini Banana Bread is an incredibly moist guiltfree quick bread This easy recipe uses applesauce and Greek yogurt for clean substantial slices…
Healthy Salad Dressings Homemade Fast Clean Eating Vinaigrette
— Healthy Salad Dressings shouldnt come from a bottle Learn our classic perfectly emulsified vinaigrette recipe This homemade salad dressing is healthy clean…
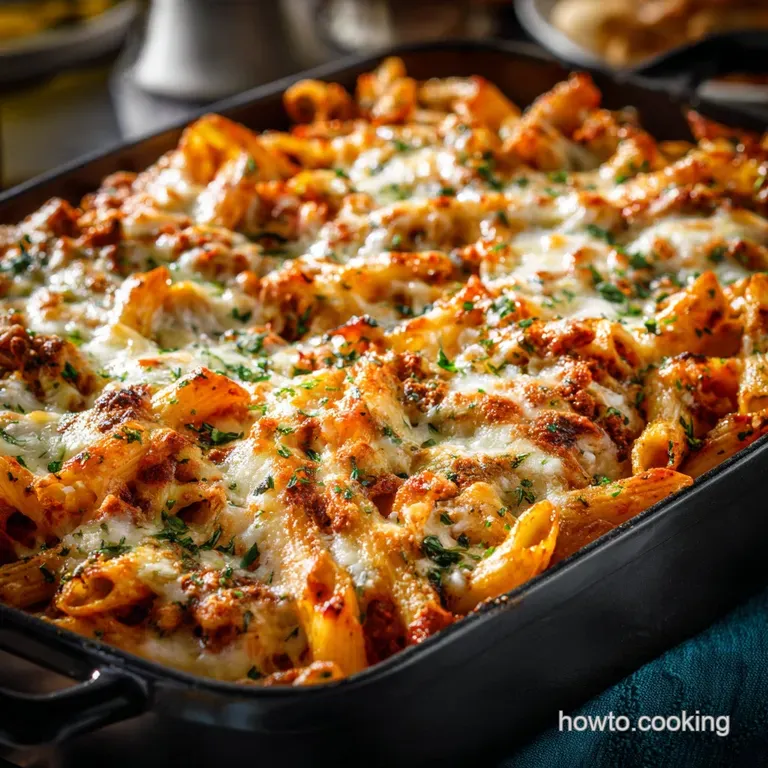
Step and by-Step Cooking: Mastering the Assembly of Your Healthy Baked Ziti
Crafting the Savoury Sauce: Sautéing and Simmering Techniques
Start with the hidden veggies. Get your oil hot, then drop in the finely diced onion, carrot, and courgette. Sauté for a full 8–
10
minutes until they are seriously soft. If you rush this step, the veggies will remain crunchy, and the secret is out. We want them invisible.Once they’re soft, push them aside, brown the lean ground turkey, and drain any residual moisture (which should be minimal). Stir in the garlic and dried herbs, cook until fragrant, and then pour in your crushed tomatoes and stock.
Simmer this for at least
30
minutes, uncovered for the last 10 if it seems thin. We need a thick sauce because the pasta will absorb moisture during the bake.Prepping the Pasta: Al Dente is Your Best Friend
Bring the water to a rolling boil and salt it heavily. Drop in the whole wheat ziti (or penne) and set your timer for one minute less than the shortest cook time listed. Drain immediately.
Do not rinse the pasta! You want that starchy coating clinging to the noodles. It helps the sauce adhere and contributes to the overall structure of the casserole. Rinsing makes everything slippery and prevents binding.
The Perfect Blend: Combining the Sauce, Meat, and Inner Cheeses
While the sauce is simmering, mix your inner cheese filling: ricotta (or blended cottage cheese), the binding egg, nutmeg, parsley, Parmesan, and 1.5 cups of your mozzarella.
Once the sauce is thick enough, dump the drained, al dente pasta straight into the pot. Gently toss everything until every single noodle is absolutely drenched in the savory ragù.
I learned the hard way that mixing it all now prevents those sad, dry pockets of white pasta you sometimes find in poorly assembled baked dishes.
Layering for Success: How to Achieve Maximum Melt and Crisp
Preheat that oven to 375°F (190°C). Grease your casserole dish lightly.
I use the clean layer method because it makes for much tidier serving, especially for a high and protein casserole that needs structure.
- Spread half of the fully coated pasta mixture into the bottom of the dish.
- Dollop the entire ricotta mixture over the top. Gently spread it out it doesn’t need to be perfect.
- Top with the remaining half of the sauced pasta.
Cover the whole dish tightly with foil. This ensures the pasta finishes cooking in a steamy environment without drying out. Bake for
20
minutes, then remove the foil, scatter the final half and cup of mozzarella on top, and bake uncovered for 5 7 more minutes until golden and bubbling.
Maximizing Your Cook: Storage, Swaps, and Nutritional Deep Dive
Freezing & Storing: Safely Meal Prepping This High and Protein Casserole
This is seriously one of the best recipes for meal prepping. You can freeze this
Healthy Baked Ziti
either baked or unbaked.If you’re freezing it raw (the best way for texture retention), assemble it fully in an aluminium foil pan. Cover it tightly with two layers of foil. Freeze. When ready to use, thaw it overnight in the fridge and bake as directed. It holds up beautifully and remains a robust, high and protein casserole.
Leftovers store well in the fridge for up to four days.
Customizing Your Dish: Vegetarian and Gluten and Free Ziti Variations
Making this
Healthy Baked Ziti Vegetarian
is super simple. Swap the ground turkey for 1.5 pounds of finely chopped mushrooms (cremini and shiitake mixed are great) and make sure you cook them until all their moisture has completely evaporated before adding the crushed tomatoes.Alternatively, use a high and quality plant and based mince.
For gluten and free needs, just use GF ziti or penne. Be extra cautious about the al dente rule; I recommend shaving
two
minutes off the package time instead of one, as GF pasta tends to absorb liquid quickly.Calorie and Macro Breakdown: Understanding the Nutritional Impact
Since we swapped out high and fat meats for lean turkey and used whole wheat pasta, the nutritional impact is phenomenal compared to the original. This is a genuinely satisfying,
Low Calorie Baked Ziti
that still feels indulgent.We’re hitting around 430 470 calories per large serving, but you are getting a huge amount of dietary fiber and over 30 grams of protein thanks to the lean meat and part and skim cheese. It truly delivers on satiety.
Expert Tips: Preventing a Dry Bake and Ensuring Rich Moisture
Dry baked pasta is the worst. If, after simmering for
30
minutes, your ragù looks overly tight, add a splash of stock (or water) before you mix the pasta in. Better slightly looser than too dry.But the single most crucial tip, the one that guarantees perfect slices instead of a messy pile (I know this from experience), is resting. Take the ziti out of the oven, put it on the counter, and let it sit for
10
minutes.That wait allows the internal heat to redistribute and the cheese and starches to set. This is how you achieve those clean, photogenic, and moist portions. Seriously. Be patient.
Recipe FAQs
Can I prep this whole dish before Sunday lunch?
Absolutely. Baked pasta dishes are brilliant for making ahead; you can assemble the entire casserole (up to the point before sprinkling the final mozzarella topping) up to 24 hours ahead of time.
Just cover and refrigerate, then add an extra 10 15 minutes to the initial covered bake time since you’ll be cooking it from cold.
What makes this specific Healthy Baked Ziti recipe lighter than the traditional high street version?
We reduce fat significantly by using lean ground turkey and part skim dairy, but the biggest win is tucking finely diced vegetables (like courgette and carrot) into the sauce, which naturally boosts fibre and essential nutrients without compromising the classic, rich flavour profile.
My baked pasta always turns out a bit sloppy; how do I get a neat slice?
The key is two-fold: ensure your ragù simmers long enough to reduce and thicken properly before mixing in the pasta, and crucially, let the finished dish rest out of the oven for a full 10 minutes it’s a proper necessity for the sauce and cheese to set up.
I only have Penne pasta; is Ziti essential for this recipe?
Not at all, mate! While Ziti is traditional, Penne, Rigatoni, or even Fusilli work perfectly well, as their ridged or tubular surfaces are excellent at holding onto that luscious ragù and creamy ricotta filling.
This recipe makes a lot does it freeze well for batch cooking?
It freezes beautifully. Once baked, allow the dish to cool completely, then cut into individual portions and freeze in airtight containers for up to 3 months; reheat gently in a covered dish in the oven until piping hot through the middle.
Jeannie notes.. Above is curated for evaluation and recommendation from howto.cooking
Read full article here:
Healthy Baked Ziti the Lean Luscious Comfort Dish
reco low-cal
Leave a Reply